Handmade cards - Christmas Holly card.

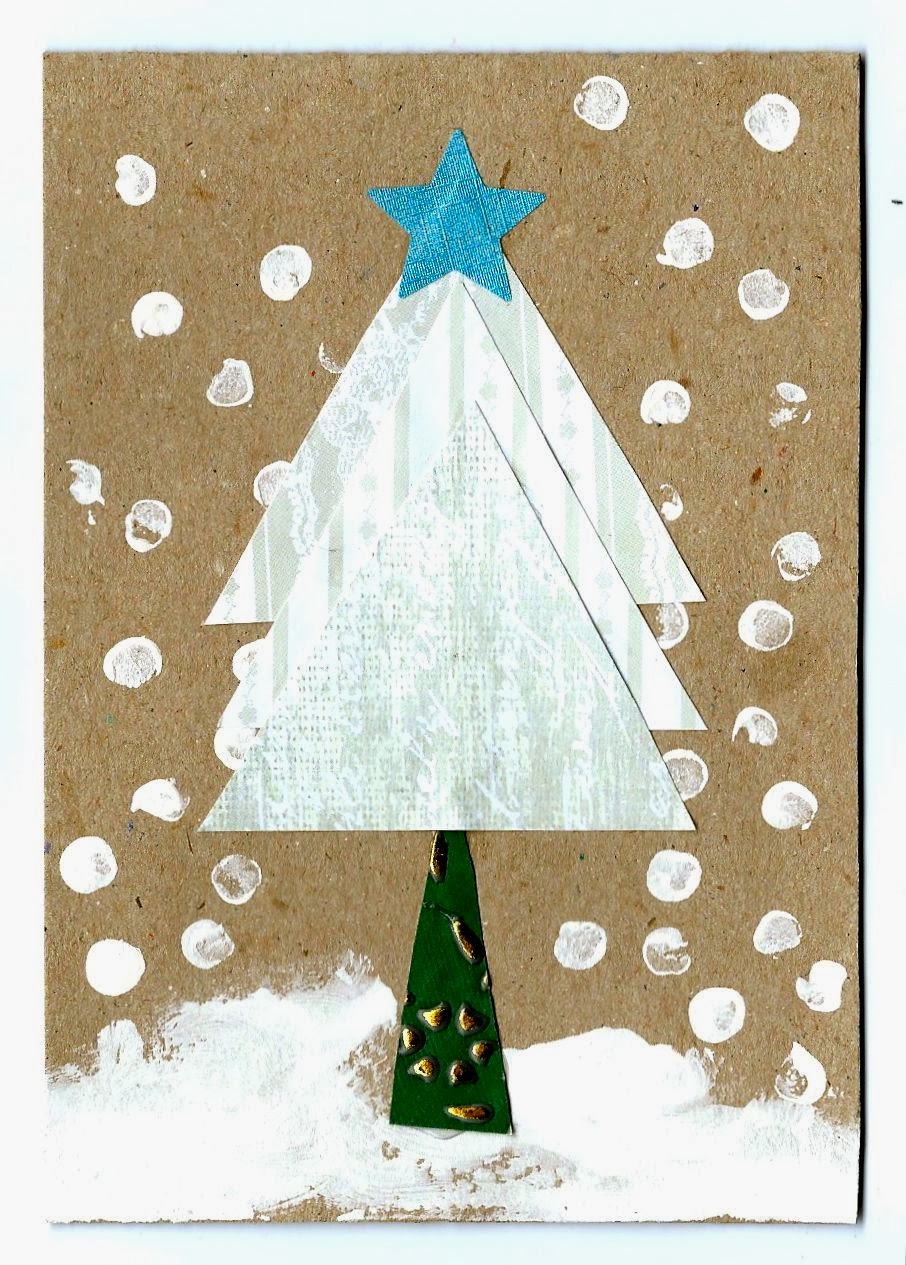
OK, here we are with another easy design for you to customise in your own unique way.  Holly is wonderfully Christmassy and a plant which is only really truly appreciated this time of year, so to show our appreciation for this prickly symbol, we took a very standard design which we initially used in our November Crafty Box on a trivet for our crafters to make and placed it on a greetings card.
The trivet is also available in our bumper Christmas Craft Box, in which there are also materials to make angel decorations and a felt snowflake decoration, Christmas or 'thank you' cards and lots more to boot.


You will need;

  • card/heavy paper/old Christmas card
  • scraps of wrapping paper
  • white paint
  • paintbrush (or finger)
  • glue


Instructions;

  1. On a scrap of nice paper, draw two holly leaf shapes and cut them out
  2. Using a contrasting paper, cut out three small balls for berries
  3. Fold your card in half or use an old Christmas card and in the middle paint a messy large white snowball
  4. Arrange and stick your holly leaves in the snowball and then stick the berries in place
0

Handmade Advent Calendar


I love advent calendar's, but I hate rubbish chocolate.  One year I fobbed the little foxes off on the Cbeebie's online advent calendar of music and video clips, claiming it was better than getting a sweetie every day.  They were young.  They were innocent.  There is no way they are falling for that this year!

I was working on this month's crafty box, I'd a nice design for a loo roll Father Christmas when I suddenly thought; 'This could work as an advent calendar'.  So, I began collecting loo rolls; 25 of them.  Making white pom poms; 25 of them.  (I've posted on the easiest way to make these - with a fork would you believe.)  I used my design for this year's Mrs Fox's gift tags (which are FREE to download) for the Father Christmas' face - you can download and print 25 Father Christmas faces HERE.


So, here's how you make the advent calendar:

You will need:
25 loo rolls - Never thought I'd get to say that!
red paint
white wool
fork
black pen
string
S
stick or bamboo cane - optional
sweets and/or little gifts
glue
scissors
and Mrs Fox's printouts.

First paint your 24 loo rolls red and leave to dry.  While they are drying make 24 pom poms instructions are HERE.  Leave the string you use to tie round the centre of the pom poms long, as you will use this to attach the pom poms to Father Christmas' hat.

Take your red loo rolls and fold them as follows:


Print and cut out the Father Christmas faces and the numbers from Mrs Fox's.  Glue them onto the loo roll and draw the rest of your Father Christmas onto the loo roll with black marker.  Draw one hand holding the number.


Make a small hole with a darning needle in the top of each Father Christmas.  Through the hole thread the pom pom strings and secure to his hat with a double knot.  Next, thread your pieces of string through the top of Father Christmas' hat and knot in a loop.  I cut my string different lengths so Father Christmas could hang at varying heights.


Fill each of your Father Christmas from the leg end with a sweet (I have 2 children and put one for each child in mine).  I put a small gift in the 24th Father Christmas so they have a little something extra on Christmas Eve.  I figured they get so much on Christmas Day that I would make Christmas Eve special instead.

I looped each Father Christmas in numerical order onto a stick that we had found on one of our dog walks and have tied another piece of string onto this to hang it over the mantle piece.  You could use a bamboo cane or you could instead tie the Father Christmases onto a longer piece of string making a garland, or hang the Father Christmases onto wall mounted clothes hooks, over a mirror or a piece of furniture whatever works best in your home.

I can't wait to hang my advent calendar over the mantle piece on Saturday night, when Brian the Elf should also be arriving - more about him follows.

We've loads more crafty Christmas ideas this festive season, so why not subscribe to our blog and/or newsletter.  And some of the best ideas for crafts with children we've distilled into a Christmas Craft Box that we will deliver to your home for £15 +p&p, check out the contents HERE.
4

Handmade Christmas Cards - The Not So Lonesome Pines.

So the Lonesome Pine Christmas card was simple and surely there couldn't be a more simple card to make... well, perhaps not more simple but then, maybe as simple.
Instead of the Lonesome Pine, which seems a rather sad title for a Christmas card (especially as the pine is not an unhappy one), we thought we'd bring in a few friends, hence the Not So Lonesome Pines.
Just as easy and just as beautiful.              

You will need;

  • card/heavy paper/old Christmas cards
  • scraps of wrapping paper
  • white paint
  • paintbrush (or finger)
  • glue
  • scissors
Instructions;
  1. Fold your card or use an old Christmas card and along the bottom half, messily paint a snowy landscape
  2. Cut triangles out of your paper scraps or old cards
  3. Cut some strips out of paper scraps for trunks
  4. Stick the trunks around the snowy landscape
  5. Stick a triangle over the trunk
  6. If you wish, using a finger or a chop stick, dot snow around the trees

1

A Creative Weekend

Monday, and I've;

taken the little foxes to school;

walked the dogs;

baked some bread;

packed some foxes;

have a new host of felted animals on Folksy,
feeling pretty good.  What did you do today?


2

Handmade Christmas Cards - The Lonesome Pine.

Making a beautiful Christmas card at home probably couldn't get more simple than this, yet the finished item is charming by this very simplicity.


You will need;

  • card/heavy paper/old Christmas card
  • old Christmas card (to cut shapes out of) or,
  • wrapping paper scraps
  • glue
  • scissors
  • white paint
  • paintbrush (or finger)

Instructions;

  1. Either fold a piece of card or use an old Christmas card and messily paint the bottom half white
  2. Cut 3 equal sized triangles out of your paper scraps
  3. Cut a strip of paper/card to use as a tree trunk
  4. Stick the trunk near the bottom of the card.
  5. Stick the triangles so that the top points overlap the next triangle to form the top of your tree
  6. Stick the tree over the trunk so that it pokes out of the tree's skirt
  7. Using white paint on your little finger or a chop stick, dot falling snow around the tree
  8. If you are using an old card, cut and stick a piece of paper inside over the old message so that you can write your new message to the recipient
Hey presto!  Easy for small and big people alike to make lots of these, all slightly different - same same but different, as they say in Thailand!
0

Two Parties


Along with getting all our Christmas boxes out to our crafty subscribers Mrs Fox has also been busy with parties.  

We had a rock and roll baby shower to put together for three mavens of the media world.  


And a party for a nine year old who loves books.  Can you spot who here favourite author is?

Tableware

Peach lanterns

Invitation and breakfast kit

Midnight Feast Kit Party Bag


Bunting
Party Craft - Wooden Spoon Dolls

Pinata


Mrs Fox's can create a themed party box for any occasion.  Handmade and unique our party boxes are lovingly created and will arrive at your home by courier with everything you need to hold an inspired party.  Get in touch for details info@mrsfoxs.com. 
0

Handmade Christmas Cards - The Snowman.

This is yet another unbelievably easy Christmas card design and there are two ways to achieve the final result.  If you get your pieces cut and prepared beforehand, your little one's can just stick the paper in place and the card will see them proud.


You will need;

  • card/heavy paper/old Christmas card
  • white paint
  • paintbrush (or finger)
  • glue
  • scraps of wrapping paper and/or fabric
  • cardboard
  • marker pen


Instructions;

  1. Using scraps paper or fabric, cut out a hat shape, a carrot shaped nose and a scarf
  2. Paint one large white circle towards the bottom of the card and another on the top of this, then smudge some white paint around underneath the bottom circle (**)
  3. When the paint is dry, stick the hat on top of the top circle, the scarf around the neck and the carrot shape where you want the nose to be
  4. Using marker pen or scraps, make some dots for eyes and buttons
  5. Using thin strips of cardboard, cut and stick on 'twig' arms
  6. Using a finger or the end of a chop stick, dot flakes of snow around the snowman          
**Instead of using paint, cut out a wave of white, then a large and a small circle and use these for the head and body of your snowman before adding his accessories.

This one below was made using an old card for the background and cut paper for the snow and the snowman.


Mrs Fox's loves to craft and create and celebrate the festive season with hand-made creations.  This year we are doing a series of posts on handmade Christmas cards you can create with your children, or for even more ideas check out our "Handmade Cards" pinterest board.

http://www.pinterest.com/mrsfoxs/handmade-christmas-cards/

0

Handmade Christmas Cards - Part One


This month the first of our Christmas Craft Boxes go out.  They contain; child friendly craft kits including materials and instructions to make;
6 hand-made Christmas cards,
2 Christmas trivets,
pom poms,
hand-made gift boxes,
concertina Christmas trees,
and a Father Christmas from a loo roll.
There is also a recipe for Christmas ginger cookies.

So, this November's Crafty box is filled with things to make for others and the hand-made Christmas cards have really caught our imaginations and that of our little foxes too.  It seems that their fascination is to be the expected, in fact Nina Fox has been telling me of her discovery on the origins of Christmas cards:
"Our modern day Christmas cards were almost certainly based on the 'Christmas Pieces' made by children in the early 18th century.
School children would write affectionate, often rhyming, messages to their families on special paper with an engraved border and then decorate them further before taking or sending them home.  These engraved Christmas papers were designed to show parents how well their children’s handwriting had improved over the past year, and are now rare and extremely sought after examples of children's artwork."
We hope that our suggestions and papers help our crafters to create sets of cards with a cohesive theme where the colours compliment, no matter how different the designs and shapes used are...

Those familiar with us will know that we do our upmost to ensure that everything in our monthly boxes that can be, will be, used somehow within the crafts.  We relish our self set challenge to recycle as much as is possible.  We tell our crafters that anything left over should not be thrown away as it will come in handy for future crafts and November's 'making Christmas cards' craft is a perfect example of how to use up remnants of paper snips too beautiful to have gone directly into the recycling.

If you have any card, thin cardboard, heavy paper or even last year's cards and some wrapping paper, you and your little one's can have fun making all the cards you need this year.  You will be recycling, having fun and reminding people that you think of them and love them, all rolled together in one fun activity.

We will be running a series of posts explaining how we made our designs (see below) with instructions so that you can make beautiful cards using materials you will probably have at home.


For even more ideas check out our "Handmade Cards" pinterest board.

http://www.pinterest.com/mrsfoxs/handmade-christmas-cards/

5

Monday Morning


This weekend I was catching up with friends in Shropshire and not really doing much work, for the first time in ages.  (Well, except for felting the two little foxes above.)  I've got home to find there are so many emails.  So much to do.  The run up to Christmas seems to have hit me today.  Full throttle, WAP!  Time to get up and go.  
Our next crafty box is due out to subscribers this week and it is the first of 2 Christmas craft boxes.   You can pre-order yours here for £12 +p&p After Wednesday the price will go up to £15 so get in there quick.

The Christmas gift tags certainly seem to be going down well on pinterest, where they are being repinned and liked all over the place.  My inspiration was this old Christmas craft pattern:


We have some great posts coming up over Christmas; loads and loads of craft ideas and freebies, ideas for hand-made Christmas gifts and alternatives to just spending loads of money on gifts and leaving your January bleak and bare.  We've some extremely talented fellow designer makers and artisans we would love to introduce you to and a few competitions to win some lovely hand-made items.  So, to keep up to date why not follow or subscribe to the blog?

https://www.facebook.com/AuntieMims
Just as a little taster, here is a great competition from the lovely Auntie Mims whose beautiful personalised wooden spoons I spotted in my Not on The High Street catalogue this weekend.  If you go to her facebook page you can enter a competition for the chance to win a personalised Santa's treat plate as pictured above.  Go on - you know you wanna!


0

Kid's Crafting Essentials


Mrs Fox's Crafty Boxes has been running for 9 months now and we are having so much fun.

There is a skulk* of crafty little foxes that once a month get our themed craft boxes delivered to their door.  We all let our creative juices flow and make things together, and it is wonderful to be the people who make that happen.

As a special gift to our lovely subscribers we send a hand-made folder to store each months instructions and a largish recycled box with their first month's subscription.  The box is for them to store their crafting materials in, ready for them to decant and use with the arrival of each month's craft goodies.  We also attach to the crafty box a list of crafting essentials and we thought it might be a good idea to share with you.  Here it is:


Double click HERE for a printer ready version.


*skulk is the collective noun for foxes

0

Mrs Fox's Christmas Gift Tags - FREE to Download


Yup, I know, Christmas posts already!

But with the little foxes back at school after their half term break, I have spent almost the whole day fulfilling Christmas orders from our Folksy store.  As I mentioned in the last post we were featured on the Folksy newsletter a few days ago and have been inundated with sales of our felted red fox christmas tree decoration.


I'm also working on making the fox a little felted badger friend.

So, what with the little foxes, badgers and this month's crafty box being all about Christmas crafts, I'm starting to get in the mood for the big C.  It is becoming a Mrs Fox's tradition to design a set Christmas Gift Tags each year which we give away on the blog as a little Christmas gift from us to you.  So, here are this year's gift tags for you to download and use to make your Christmas gifts bright and festive:


Simply click through to our shop (they are completely FREE) find gift tags in our shop, click on them to download the PDF, print, cut out, punch a hole and thread some string or ribbon through the top. 

And in case you fancy something a little different, here are last years:


0
Back to Top