Showing posts with label how to make. Show all posts

Mrs Fox's Crafty Boxes - A Felt Apple Needle Case

how to make a felt apple needle case
Mrs Fox's Felt Apple Needle Case Kit
Apples are on my mind at the moment, there is no two ways about it.  I've spent a lot of time digging holes and planting apple trees in our garden, you'll find more on this little adventure on Mrs Fox's Den.

how to make a felt apple needle case
Needle Case Kit

Last week I ended up digging out the felt apple needle case kit I made last year, dead simple to make and a lovely gift.

how to make a felt apple needle case
Shapes to cut out to make our own felt apple needle case

You will need:

2 Red & 2 white felt squares approx 15cm x 15cm
Smaller scraps of green and brown felt
Ribbon
Red, white and green embroidery silks
needle and scissors

You will need to use blanket stitch and running stitch.
  1. Cut out 2 red apple shapes that take up almost the whole 15cm square.  Then 2 smaller white apple shapes.  
  2. Take the white embroidery silk, threading your needle with two strands.  Centre one of the white apple shapes on one of the red, sew them together in a neat running stitch around the edge. 
  3.  Using a single strand of white sew a blanket stitch around the circumference of the other white apple shape.  Position the brown pips onto this shape and overstitch them into position.
  4.  Lay the second piece of white onto the first, line them up and with a neat running stitch (again in white) sew up the centre of the two pieces.  
  5. how to make a felt apple needle case
    And the back looks like this...
  6. Take your ribbons and secure them with a few stitches to the back of the red apple shape, being careful not to go through the white pieces as well.
  7. Take the second piece of red apple, arrange the stalk and leaf in position slightly overlapping the leaf onto the stalk and sew into place using green thread, making sure you put a couple of stitches through the leaf, stalk and red apple shape to hold them all together in place.  Sew up the centre of the leaf in a running stitch.
  8. Finally, lay the two pieces of red apple together, using2 strands of red thread and starting at the stalk, sewing away from it, sew the two apple pieces together using blanket stitch.  When you get back to the stalk split your silk into a single thickness and blanket stitch up around the stalk. 
And there you have it a simple first sewing project and makes a great little gift for someone who likes to sew.


Mrs Fox's has made this little craft into a kit that contains everything you need to make one felt apple needle case, you can purchase the kit for £6 +p&p through Folksy.com.  


how to make a felt apple needle case
https://folksy.com/items/4495361-Sewing-needle-case-kit


Follow on Bloglovin
0

To the moon and stars... and back downstairs again...


Any familiar readers will know that we've touched on rockets before when discussing how kids often think they're not good at arts and craft, yet when they get down to it, can create works that they're deeply proud of.

Our Crafty Box subscribers will also know that we have had a little focus on ‘things that fly’… our 3rd Crafty Box was centred around animals that fly and we included crafts for making different types of birds, flying fish and and a bird house.
Our latest Crafty Box is about man made ‘things that fly’ and we found ourselves looking at rockets again.  We've both made plastic bottle rockets with our kids before so we wanted to try a different version and came up with a kitchen roll rocket.  You can also make these rockets with toilet rolls but we've been told that schools and nurseries may not be able to use toilet rolls for crafts due to health and safety… should you feel comfortable with toilet rolls, go ahead.  Our little foxes make lots of things with toilet rolls so we keep lots in a box!

For the kitchen roll rocket you will need;
  • A kitchen roll
  • Foil
  • Glue and sticky tape
  • Scraps of paper
  • Paint
  • Light card or heavy paper
  • Scissors
  • Our template for rocket fins
  • Tissue paper or bright coloured ribbons or raffia string
Paint your kitchen roll.
While it dries, (check pic below) draw a circle with a roughly 5cm radius and inside this, a circle with a 3.5cm radius.
Cut out your circle and make snips from the outside to the 3.5cm line and one final snip to the centre of the circle.
Fold the circle into a cone and glue or tape together.
Take a 17ish cm strip of foil an fold both long edges in to give your strip a nice tidy shape.
Copy our template below, cut out 3 rocket fins from your heavy paper.


Fold them down the middle and glue the larger parts together leaving the outer strips glue free.

Now that the painted roll is dry, put your cone on the top of your kitchen roll and bring the frilled edge down so that it attaches to the roll and hold in place with sticky tape.

Cover your cone in foil and then wrap around your straight edged foil strip where the foil from the cone overlaps the kitchen roll.

Your fins will need to be attached approx. 5cm apart around the tube and you can either glue them to the outside then paint in the same colour as your rocket, or, cut 6cm snips upwards from the base, 5cm apart around the base and slide the fins into place. 

Cover the protruding parts of the fins with tin foil. 

Paint or draw on your windows and rocket name/initials.  Alternatively, make these from scraps of paper and stick them on.

Stuff the tissue paper inside the rocket so that it spills out like flames


For the plastic bottle rocket... 


...you will need;
  • A plastic bottle
  • Foil
  • Scissors
  • An egg carton
  • Tissue paper or coloured strips of paper
  • Scraps of paper
  • Sticky tape
  1. Cover your bottle in foil
  2. Cut out 3 or 4 cups from the egg carton and cover in foil
  3. Make a door and windows and cut out initials for your rocket’s name and decorate your rocket
  4. Using sticky tape, attach your foiled egg carton cups to the bottom of the rocket
  5. Again, use tape to stick your tissue paper ‘flames’ into the egg cups

The bottle rocket is certainly one which younger hands will find more fun, they get to squish and press the foil, it's a very tactile craft.  My young fox had been certain that he could never make anything look as he thought it should look but at 4 years old, this rocket changed everything.  He was proud as punch with this one and we stuck it to the bedroom wall under his giant foil moon and stars.  Every now and then, he would thunder up the stairs and come running back down with shiny rocket to show it off to any friends and family who had not yet witnessed his NASA craft.


0

Easter Baskets.

mrs fox's crafty boxes easter 2013

Our Mrs Fox's (Easter) Crafty Boxes are on their way and all the crafts will be centred around the egg carton in which the main craft is packaged.  In the egg carton are the main components of the main craft but once these are made, you're left with a very handy box.  We have thought of many things to do with this usually 'recycled in the recycle bin' box.  We have three idea's just for the lids, two of which are specifically dedicated to the main craft.  The third idea we offer for the lid is not.

For this third craft, we suggest that you take the lid (of a 6 egg box) and turn it into an Easter basket.  If you make this yourself, you could present it to your child with chocolate eggs inside or have them use it for an Easter egg hunt.  If your child is one of those rare young beasts (surprisingly I actually know of 3) who don't like chocolate, you might want to choose to put a little gift or two in the box or use gifts in the hunt rather than choccy eggs.

mrs foxes crafty boxes easter baskets 2013


I am going to put a little gift in this box for Eve as she helped me to make it - and then she can use it for the choccy egg hunt that her Aunty Sarah is planning.

I found a lovely little wooden chick brooch on Folksy so I bought one to pop into this basket and then, because my girl can never have enough colouring pens, pencils and crayons, I'm going to add some of these beautiful locally handmade crayons.

mrs foxes crafty boxes easter crayons, win, giveaway


You could win a free set for your little ones, just post us a comment below by 23rd March on what you think our other two idea's for the lid of the egg carton are.  We have 4 sets to give away for either the correct idea or for the most interesting idea's - something to do with chicks...

To decorate our basket, we used;

  • the lid
  • 2 paper doilies
  • a sheet of tissue paper
  • some paper scraps for petals
  • some tiny cuts of felt for the middle of the flowers
  • some raffia ribbon.


To make the basket, simply;

  1. Smear glue to the bottom and sides of the egg carton lid and place it in the centre of your doilie and then bring the sides up so that they stick.
  2. Then cut another in half and stick it round side to the top, flat side folding underneath the lid then fold and stick the sides down. 
  3. Next, fold some yellow tissue paper and glue it to cover the inside of the lid.  
  4. The flowers on the outside were Eve's idea to make it prettier - cut some small flower shapes from some scraps of paper (we keep all our interesting paper scraps) and stick them around the outside before adding the yellow felt 'pollen' flower centres.
  5. With a hole punch, punch holes in each corner of the box and tie the raffia ribbon diagonally across the basket.


If your child is a boy, you could paint the lid to look like a standard punnet and put straw in the bottom (I'm doing this for my 2 boys) or decorate the lid in one of the ways we have suggested in our craft box - more on that one later though... don't forget to send us a comment with your idea on what our ideas might be!
11

How To Make The Easiest Tutu Ever

peacock tutu  children kids party

I made Little Una Fox a tutu to wear to her peacock birthday party.  I have looked at a couple of different ways to make tutu's and decided that I was going to keep it really simple as I intended to decorated this one with a felt peacock tail.  So the method I used to make the tutu is so simple there is almost no sewing involved.  You can add the peacock tail or not of course.  Here's how I did it:

You Will Need:
For the tutu
elastic approx 2cm wide - a length roughly 4cm larger than your child's waist measurement
tulle - I used almost all of 3 x 5m rolls in 3 different colours
ribbon in a contrasting colour 3 x length of your child's waist.
scissors
needle and thread - optional

For the peacock feathers
purple, green, blue and brown felt
paper & pencil
scissors
pins
glue
ribbon
needle and thread
gold thread - optional


To make the tutu:
1.  Measure your child's waist and cut a length of elastic approx 4cm larger than this.  Create a waistband by sewing the two ends together.  If you really can't sew you could just knot it.
(The extra 4 cm is to allow you to sew the two ends together and also the thickness of the tulle wrapped around the waistband of the tutu needs to be taken into account in the waist measurement - so, I'm being generous with the elastic.)


2. Measure from your child's waist to your child's knee and add about 2cm.  Cut strips of tulle double this length and approx 14cm wide.
how to make peacock tutu  children kids party craft


3.  Loop your tulle round the elastic and then back through on itself; see steps 1, 2 & 3 in the pictures above.  Keep doing this until you have completely covered the elastic waist band, alternating the different colours of tulle; and voilà...

4. I also threaded a piece of contrasting ribbon through the tulle loops at the waist to tie in a bow at the front or back if you are not making the peacock tail.


To make the feathers:
I made 10 feathers as this number forms a nice symetrical triangle pattern, you could do more or less.

how to make peacock tutu  children kids party craft

1. Draw a design for the feathers onto A4 paper and from this make a template for each part of the feather; see the pictue below:

how to make peacock tutu  children kids party craft

2.  Assign each part of the feather a colour then pin that piece of the template to the felt and cut around.  Make as many as you want feathers. Then with fabric glue, used very sparingly, you can glue each section of the feather one on top of the other.

3. If you wish you can also embroider lines of gold onto each feather.  I used a few extra stitches to secure the layers of the feather design.

4. Sew the first few feathers to the ribbon you have looped through the waistband of the tutu.  Then each remaining feather can be sewn to lengths of ribbon and then the ribbon sewn to the waistband.  Vary the lengths of the ribbon so that the peacock feathers hang at different lengths down the back of the skirt. 

how to make peacock tutu  children kids party craft


0

The making of Miggins (and chums).


Following on from our 'Santa's Little Helper' post, here is how I made Miggins, Buba, Pickle, Luna & Jay from the following bits and bobs;
  1. a wooden bead
  2. a cotton reel
  3. green garden twine
  4. garden string
  5. raffia paper and
  6. glue
  7. a little paint (and/or pens) for the reels, hats and facial features
The first thing I did was chose the colour for each elf and paint the reels and hats.  I went for autumnal colours, probably inspired subliminally by the season I was in rather than traditional Christmas colours...
Once the paint was dry, I chose my colour raffia ribbons which I wound with glue around the reels to dress my elves.
Then I cut 2 lengths of garden string and wound one end of each tightly into little flat spirals and glued them solid for the feet.  (A couple of elves got fancy footwear in the end but the others were more modest.)

Once the glued feet were dry, I decided how long I wanted the legs to be and stuck part of the string 'legs/thighs' to the bottom of the reel.  I then snipped off excess twines within the string and threaded the remaining lengths through the middle of the reel - then through the wooden bead head, gluing them to the head to hold it all tightly together from the feet through to the crown.  For some, these were the first strands of their hair.  (I so hope that this leg part makes sense!  The whole thing, although fiddly, is very easy but explaining this finds my words failing...)

I then glued on more string or green garden twine for hair and once the glue was dry, gave it a hair cut. This, for some reason, was my favourite part of the whole process.  Very satisfying indeed.
I wound once, then tied, another length of string under the top rim of the reel closest to the head and left lengths hanging down for arms which I glued into various positions.
Next I gave the elf a face and began work embellishing the hats - my second favourite part of the job.
The tiny paper mache cones which I had earlier painted, I decorated with ribbons before gluing them a'top the head of hair.  This, being the final step, was also satisfying - not unlike putting on fancy shoes and slapping on a lick of lipstick before leaving the house one of those very rare nights out when you've made an effort not to wear jeans and boots.

Before I knew it, I had a group of little elves sitting on my dresser smiling at me - and before long, they all had their little sacks of lavender sitting next to them.
Unfortunately, I think my oldest fox at almost 7 is too old to fall for this one again although he's actually the easiest to get into bed these days - and the earliest to rise... but I think foxes 2 and 3 might really like the idea again this year.  They will keep one eye on the elf, I think, waiting for it to twitch into life while the lavender sack in their bed helps them to calm down and settle into a much needed sleep.

These are not at all complicated to make but if you want to make one and don't have the bits, for £4.25 we can supply you with a kit containing all you need to make your own little elf, excluding paint and glue.  We have small 'small' or large 'small' reels (they are all pretty weeny) so please stipulate if you would like a shorty short or a tall short elf.  Just send us an email or leave us a comment and we will get back to you.

The kit contains;
  • A reel
  • A wooden bead
  • A length of green garden twine
  • A length of garden string
  • A little cone
  • A length of raffia 'ribbon'
  • Fabric for the sack
  • Home picked and dried lavender
  • A length of fine fabric ribbon


1

Cardboard Challenge - Caine's Arcade


We saw this amazing Youtube clip thanks to one of the other Britmum bloggers.  It’s about a boy called Caine, who lives in LA and created an incredible cardboard amusement arcade in the front of his father’s hardware store.  Cardboard is one of my favourite materials for creating with the kids; it’s readily available and so easy to use.  

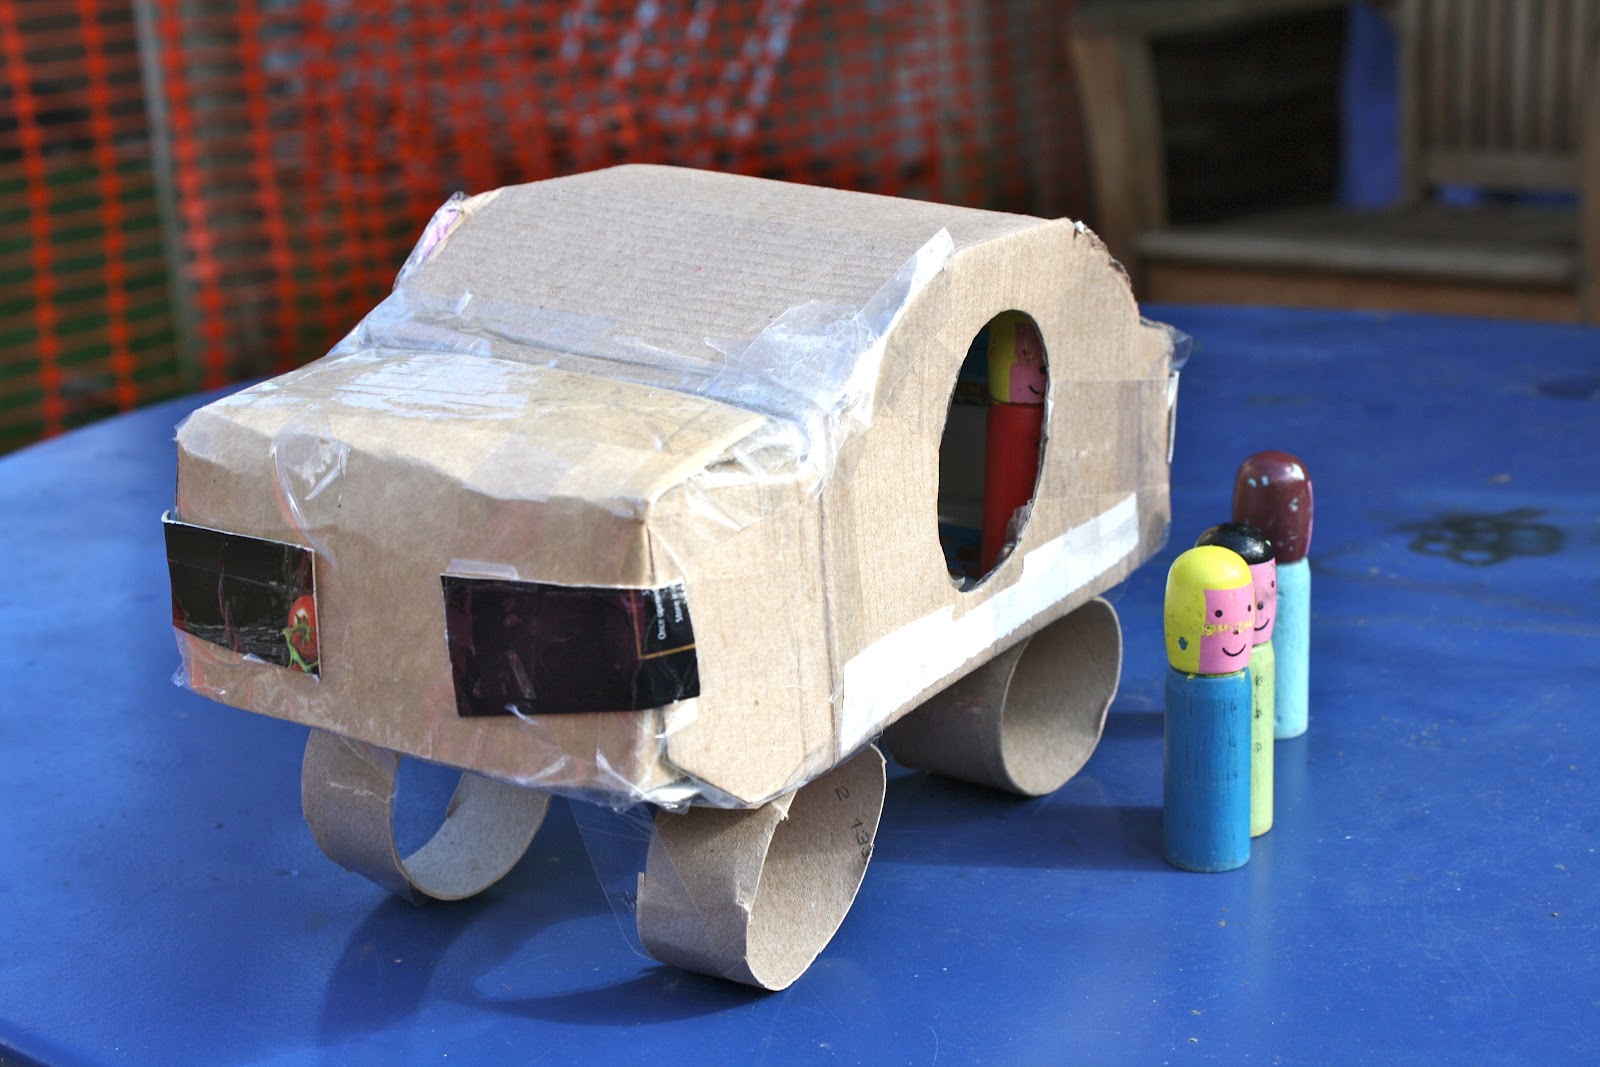
When I showed my children the Caine’s Arcade short film, they sat watching it silent, unmoving, engrossed.  At the end of the film Una turned and said "he’s a genius!”  Today is the day for Caine’s Cardboard Challenge.  So, we at Mrs Fox’s have each set our little foxes loose armed with tape, scissors and cardboard and this is what they made:

Daddy Fox was in charge of cardboard creativity today in our house.  Louis wanted to make a car.  I think he had a little help.  He is very pleased with his creation.  He’s been putting his torch and some little people from his wooden bus inside it and taking them on imaginary journeys.

Una wanted to make a house.  She took the whole thing very seriously and I think what she got from looking at Caine’s arcade was to think about how her creation would work.  The interior of her project is as important as the exterior.  She has lots of ideas about how the house will function.  And she is still working on it this evening, with further plans for a roof garden.


And from the other Mrs Fox:


I’m clear on the fact that this is not the most original idea in the world but upon asking our little lady what she would most like to construct out of cardboard, without hesitation, she said, ‘A castle.’  So there we had it with not a moment spared working that one out.
My oldest boy had been persuaded by a friend to join him for a tennis lesson and so we had to leave the cardboard ‘Messi The Greatest Footballer’ on the drawing board but number 3 happily piped up that he would like to make a dinosaur.  He is very much discovering his creativity recently and it was a joy watching him working out how to make an apple juice carton into one of his favourite creatures.
Eve wanted to jot down a few ideas before starting on the build and quickly found the pieces she’d need amongst my cardboard collection.  I rarely throw any substantial cardboard out to recycle as my 3 are often occupied through making something out of it, so we had a nice selection to choose from.
They are also all major Art Attack fans although at 3, 5 and 6, they’re possibly a little too young to get on with any projects unaided.  This doesn’t stop them scouring the internet for old episodes and I really don’t mind this.  They are clearly endlessly creatively inspired by Neil Buchannan and this is only a good thing.  All three of them spark with ideas when given the chance to create anything.


So, Eve chose a few simple and obvious pieces for her castle; a rectangle box and a long tube from some old wrapping paper.  With a little help from me, we cut the long tube into four smaller tubes for the turrets and having made some simple plans, off she went.  She began by cutting snips along the top box flaps, taking out alternate flaps to make the castle walls ‘go up an down like on real castles’.  Then she applied glue to a box corner and then held one cut tube firm before applying the obligatory sticky tape.  Mr Buchannan seems to love sticky tape and my children love him so everything they make has to use enormous lengths of the stuff whether it’s required or not.  Then she did the same thing to each corner and before I knew it, had me making paper cones while she peeled off strips of the beloved sticky tape to hold it tight.  Having applied glue to the top of the tubes, she gently placed a cone on top of each and ‘made it nice and straight.’
The pieces cut out from the tops of the castle were then stuck all over the outer walls for windows and she coloured in some cris-crosses on a piece of paper and cut it out into an arch shape for the portculis.


In the meantime, I had been discussing with Tom how he expected his dinosaur to look and with my help (he is only 3) we made a hole in the back of the juice carton and he happily pushed his wrapping paper tube into it as the dino’s tail.  He then cut a toothpaste box in half using my big kitchen scissors and asked me to ‘blob him some glue’ so that he could stick it on the opposite end to the tail for it’s head.  All we needed now were some legs and he said that he wanted to use the rest of the toothpaste box so I cut it into four and together we stuck them on the bottom, using the flaps as feet.
Seeing some of Eve’s cardboard cut out squares left on the table, he decided to give his dinosaur a pattern and stuck them to it’s sides – again using sticky tape.

For any of you who also have to watch endless runs of Art Attack, tomorrow they want to cover their works with kitchen roll and PVA, or ‘pervia’ as Tom calls it.  ‘Then they will be solid and ready to paint’…

So there you go, a castle and a dinosaur made out of cardboard, a small amount of paper and lots of sticky tape.

And here is some more kid's creativity with cardboard.
5

Felt Envelope Bags


I made these colourful party bags for Saoirse's 6th Birthday party.  The bags are made in felt so require no hems or turning over of seams.  The pattern is made from two simple shapes cut out using contrasting coloured felt.


TO MAKE:

1.  Cut out the two shapes in different coloured felt.  

2. place front onto back and machine along the line in zig zag stitch using white or a contrasting coloured thread.

3.  I included a loop of ribbon hand sewn onto the bag.  I cut out a felt flower with a button for the centre to conceal the  join.

I used our Belle and Boo badges to seal the bags, any badge will do.  Although I must say I think they look pretty good without anything.

Mine are the perfect size for a pack of the Rosie Flo or Johnny Joe Postcards a set of mini felt tip pens, some sweeties and balloons.  Mrs Fox will be putting the bags onto the site retailing at £4.  If you are interested in them filled as above please get in touch with the number you would like and we will quote you a price. info@mrsfoxs.com
1

Oat & Raisin Cookies

Mrs Fox loves cooking with her little foxes.  I like to wait until my kitchen floor needs a clean and then I don't care so much what ends up getting spilt on it, and the work surfaces, and the walls, and the children... well, you get the idea.


One of our fool proof recipes is for Oat and Raisin Cookies.  I kid myself that as they contain oats and raisins they are healthy, but that is me deluding myself just a little.  

YOU WILL NEED:

270g unsalted butter at room temperature

160g caster sugar

160g soft dark brown sugar

2 eggs

1/4 teasponn vanilla extract

380g plain flour

1 teaspoon salt

1 teaspoon bicarbonate of soda

1 teaspoon cinnamon

110g rolled oats

220g raisins

4 baking trays lined with grease proof paper  

Makes 20

Preheat the oven to 170 degrees C (325F/ Gas 3)

1.  Cream the butter and sugars until light and fluffy.  Add the eggs one at a time. Then beat in the vanilla extract.

2.  Sift together the flour, salt, bicarbonate of soda and cinnamon.  Add dry ingredients to the butter mixture and oats and mix well. Stir in the raisins until evenly distributed.

3. Arrange equal amounts of cookie dough balls on the prepared baking trays.  Make sure there is space around each to allow for spreading while baking.  

4.  Bake in the oven for 12 minutes, or until golden brown and firm.  Remove from the oven and leave to cool  slightly on their trays before using a fish slice to placing them on a wire rack to cool completely.


The cookies can be wrapped and included in a party bag.  It's a really sweet idea for the children to find something made by their friend in their bag, and a little healthier than all those sweets that usually end up in there.

Pictured above are the oat and raisin cookies we made for the wedding party bags.  We wrapped them in grease-proof paper sealed them with a sticker that says "YUM YUM".

0

How to Make Paper Windmills

We used to make paper windmills when I was little.  They are a great craft project for a rainy afternoon and are easy to make.

They are also a great way to decorate a party venue, or a craft that can be done at a party and can be taken home by the guests. We made paper windmills for the wedding party bags for Nicky and Nigel's wedding and printed the date of the event onto one of the sails.  To make them yourselves...

YOU WILL NEED:

a square of paper - Mine was 12.5cm (5") x 12.5cm (5")

a nail or pin tack 

dowling, garden cane or drinking straw - I used a slender bamboo cane

a bead

pencil, ruler, scissors, hammer

1.  Take your sqare of paper and fold it in half to make a triangle and then fold that in half again.

2. Unfold the paper and refering to the diagram below cut 2/3's of the way down the diagonal fold lines towards the centre point.  


3. Working in a clockwise direction take your nail or pin tack and push it through the top corner of each sail, as in the diagram above. Carefully push the nail or pin tack through the centre. 

how to make a paper windmill or pinwheel

4. Holding the windmill tightly turn it over and put a bead onto the nail sticking out of the back.  This acts as a spacer and will help the windmill's sails turn smoothly. Then push the nail into the dowling/garden cane or whatever you are using as the windmill's stick.  Tap the nail into place with a hammer, if it goes right trough the cane I just tapped the point bending it into the stick. 

make a paper windmill or pinwheel

It's best to use paper that is different on one side to the other.  We used plain brown paper first painting a design onto the back before cutting out our squares.   You can also use the scrap booking paper that has different patterns on either side. 

For the windmill's stick I used bamboo canes from the garden, with the "help" of my Patterdale who obviously thought these were new dog chews for him. I've also tried garden canes and dowling, the garden canes often split, but the dowling works really well.

0

Paper Bunting # 3 - Flowers


Mrs Fox's Flower Bunting

Mrs Fox made this bunting for the first Fairy Tea Party.  The inspiration was Mary Blair and her amazing art direction for Disney, in particular Disney's Alice in Wonderland.  

Mary Blair concept art for Disney's Alice in Wonderland
Concept Art by Mary Blair for Disney's Alice in Wonderland

To create the flower bunting I used:

Crepe paper in pink yellow & purple plus green.
Glue, scissors, pencil
Gold glitter paint
Blue bias binding, about 10 meters.

Mrs Fox's Flower Bunting

1.  I drew designs for 3 flowers and a leaf.  On each flower  I decided which colours to use on each section and cut the shape out of card to be used as templates.  I left a tag (a square of paper) at the top of each of the largest shapes where the flowers would attach to the bias binding.

2.  I then traced and cut the shapes out onto crepe paper.  Layering the shapes one on top of the other I glued them down, creating the flowers in slightly different colour combinations.  Once the glue dried on the flowers I used a little of the gold glitter paint as highlights to cover areas where the glue was showing a little.  The nice thing about the crepe paper is that once hung it is slightly transparent and means that the back of the bunting looks almost as good as the front.  

Mrs Fox's Flower Bunting

3.  Once I had my flowers and leaves (And I also cut out some crepe paper strands to imitate slender vines) I organised how I planned to hang them from the bias binding.  

Leaving about a meter at each end I folded the bias binding in half down the length sewing it together to form a strong ribbon.  Placing the tags I had left at the top of my flowers between the bias binding with approximately 20cm between each flower, I machined them into the bias binding.  Between every few flowers I also machined either a leaf or a few vines of different length.
  
How to make flower bunting

At Mrs Fox's we also created paper fairy craft kits for our Fairy Tea Party and these fairies were strung onto the flower bunting. 


paper fairy


0
Back to Top